
常见问题
固件、开发、硬件选型、生产与支持——由设计主板的团队亲自解答。可按难度筛选,或直接跳转到主题。
固件与烧录
入门How do I flash firmware onto an iTEMP Rockchip board?
Use RKDevTool on Windows (or rkdeveloptool on Linux/macOS) with the board connected through its USB OTG / download port, then flash the update.img made for your exact board.
- Install the USB driver: run
DriverInstall.exefrom Driver Assistant → Install Driver (uninstall an older driver first). - Power the board, connect the OTG port with a data cable, press the recovery key or reset until the tool shows Found One LOADER Device.
- Upgrade Firmware → Firmware → choose
update.img→ Upgrade. Wait for Reset Device.
Only use an image built for your board — the same SoC is not enough. Step-by-step with screenshots: Flashing over USB.
入门What is the difference between Loader mode and MaskRom mode?
Loader mode is the normal way to flash: it needs a working bootloader. MaskRom is the recovery mode burned into the chip itself — it works even when the bootloader is damaged.
- Use Loader mode for routine updates.
- Use MaskRom when the board shows no display, no adb, never appears as a Loader device, or a previous flash was interrupted.
MaskRom does not bypass secure-boot signatures or encryption. Details: MaskRom recovery.
进阶How do I put a board into MaskRom mode?
Hold the board’s MaskRom control while connecting USB, and release it once the tool detects the device.
- Power off and remove any bootable microSD card.
- Hold the MaskRom button, recovery button or short the two MaskRom test pads (depends on the board).
- Connect the OTG port (and power).
- Release when RKDevTool shows Found One MASKROM Device (or
rkdeveloptool ldshowsMode=Maskrom).
Timing is the fiddly part — if it is not detected, power-cycle and try again. In MaskRom you must download the loader .bin that matches the board’s SoC and memory before writing the image.

入门How do I connect to the serial debug console?
Use a 3.3 V USB-to-TTL adapter on the board’s debug UART: GND to GND, adapter TX to board RX, adapter RX to board TX — leave VCC unconnected.

Rockchip boards use 1,500,000 baud, 8N1, no flow control by default — not 115200, which shows garbage. Some adapters (older PL2303) cannot reach that speed; CH340-based adapters with PuTTY or picocom work well. The debug header location is on your board page.
入门RKDevTool says “No Devices Found”. What should I check?
Nine times out of ten it is the cable or the port, not the tool.
- Cable: a charge-only USB cable is the #1 cause — use a known data cable.
- Port: connect the board’s OTG / download port, not a host-only USB-A port. Avoid hubs and front-panel PC ports.
- Driver: uninstall, then reinstall with Driver Assistant.
- Mode: the board must actually be in Loader or MaskRom mode.
- Linux: run with
sudoor add a udev rule for USB vendor ID2207(Rockchip). - Flash one board at a time — two boards in download mode confuse the tool.
进阶Is a board that will not boot after a failed update “bricked” for good?
Almost never. A board that stopped mid-update can be recovered through MaskRom mode, because MaskRom lives in the chip and does not depend on anything that was written to storage.
Start with the serial console — the boot log usually says what failed — then follow MaskRom recovery with the loader and image for your exact board. If the board never appears in MaskRom either, contact us: that is when a hardware check makes sense.
进阶What is the difference between update.img and the separate partition images?
update.img is a single packed firmware file — flash it from RKDevTool’s Upgrade Firmware tab. Partition images (boot.img, system.img, … plus a partition table) are flashed individually from the Download Image tab or written to their offsets.
The two are not interchangeable, and both require the loader that matches the SoC and memory configuration. For everyday updates, use the update.img we provide for your board.
进阶Can I flash from Linux or macOS instead of Windows?
Yes — use Rockchip’s open-source rkdeveloptool.
rkdeveloptool ld                          # list devices
rkdeveloptool db rk35xx_loader_vX.XX.bin  # download the matching loader
rkdeveloptool wl 0 update.img             # write the image from sector 0
rkdeveloptool rd                          # reset the device
Run it with sudo, or add a udev rule for USB vendor ID 2207. Use the loader file that ships with your board’s firmware.
高级Flashing fails at “Download IDB” or “Download boot”. Why?
The loader does not match the board. The loader .bin must match both the SoC and the DDR/memory configuration; a loader from another product with the same chip is not automatically compatible.
| Symptom | Likely cause |
|---|---|
| Download IDB failed | Loader does not match SoC/DDR |
| Download boot failed (MaskRom) | Wrong loader |
| Disconnects while sending the loader | Power or DDR initialisation |
| Detected, then drops mid-flash | Wrong loader or unstable power |
| Flash completes, will not boot | Image for a different board |
Use the loader and image from your board’s firmware package, and a power supply that meets the board’s rating.
进阶Can I update a board in the field with a microSD card?
Yes, if the board still boots from SD. You need an SD-boot image made for that board — not the USB update.img, unless the package says so.
- Write the image with balenaEtcher (or Raspberry Pi Imager /
dd). - Power off, insert the card, power on — the board writes its eMMC.
- Do not remove the card or cut power while it writes.
- Power off, remove the card, power on. Leaving it in can re-flash on every boot.
A board that no longer boots at all needs MaskRom instead. Guide: Flashing from SD.
入门How do I check which firmware version a device is running?
Run:
adb shell getprop ro.itemp.firmware.versionQuote this value in every support request. The wiki is versioned per firmware release — pick yours in the version selector. If your build number is not listed, the device runs a custom image made for your project; ask your account manager for its notes.
进阶Which Android version does each board run, and can it be upgraded?
Each board ships with the Android version its SoC platform supports:
| Board | SoC | Android |
|---|---|---|
| KTM-S88CD | RK3588 | 13 |
| KTM-S76 | RK3576 | 14 |
| KTM-S68 · S58 · MS68 | RK3568 | 11 |
| KTM-S68B · LT66 | RK3566 | 14 |
| KTM-MS66 | RK3566 | 11 |
| KTM-S88 · S39-II | RK3399 | 8.1 |
| KTM-S38 | RK3288 | 7.1 |
| KTM-MS98 | Amlogic T982 | 11 |
A major Android upgrade is limited by the chip vendor’s platform support, so it is not available for every board. If your app needs a newer Android, choose an RK3588, RK3576 or RK3566 board — or ask us about an upgrade path for your model.
进阶Do the devices include Google Play (GMS)?
Google Mobile Services are licensed by Google per device model, and most signage, kiosk and industrial Android devices ship without them. Apps are installed directly (sideloaded) or through your own device-management system, and on iTEMP firmware your app can manage the device without Google services.
If your project needs Google services, tell us at the start — it affects the device, the schedule and the cost, and we will confirm what is possible for your model.
高级Can we build the Android firmware ourselves?
Yes. You can build your own Android image for our boards — see Build from source for the toolchain. Most customers prefer to have us make the changes: we maintain the board support package, and customization is part of our service.
Either way, the system API keeps working across your builds, so an app written for one iTEMP board runs on another — moving boards is a rebuild, not a rewrite.
开发与系统 API
入门Do I need platform signing or device-owner mode to control the device?
No. iTEMP firmware runs with root (SU) privileges, so a normally signed APK — even a debug build — can call every function in our system API: power schedules, display, kiosk lockdown, network and GPIO.
On stock Android these actions need a platform key or device-owner provisioning; on our boards they are one method call. Start here: ItempApiPub overview.
进阶How does the ItempApiPub system API work?
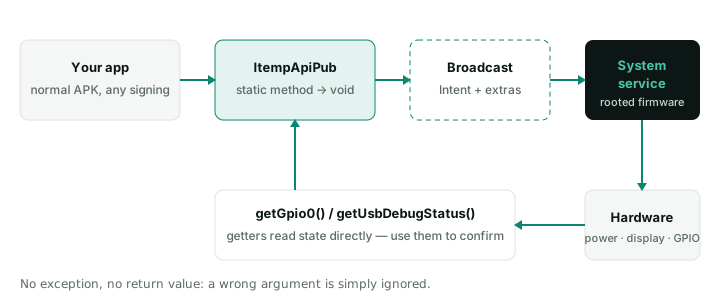
Every method is static on com.itemp.itempapi.ItempApiPub and sends an Android broadcast to a privileged system service. Calls return immediately and return nothing.
- No exceptions, no success value — a wrong argument is simply ignored. Confirm the result with a getter or a normal Android API.
- Numbers are strings:
setScreenBrightness(context, "200"), not200. Do not zero-pad ("8", not"08"). - Exceptions to the static rule:
startWifiAp/stopWifiApare instance methods.
入门How do I hide the navigation and status bars so they stay hidden after reboot?
Call the system API once from your app — it is applied by the system, not by your activity, so it survives restarts:
ItempApiPub.setNavigationBarHide(context);
ItempApiPub.setStatusBarHide(context);
Immersive mode set inside an app is temporary; the system-level call is not. Always keep a hidden way to show the bars again (setNavigationBarShow) for maintenance. See Kiosk and lockdown.
入门How do I start my app automatically when the device boots?
Register a BOOT_COMPLETED receiver and launch your activity with FLAG_ACTIVITY_NEW_TASK.
- Declare
RECEIVE_BOOT_COMPLETEDand anexported="true"receiver. - Open the app once by hand after installing it — until then Android does not deliver the boot broadcast.
- If it starts behind the launcher, add a short delay or start from a foreground service.
- Test with a real power cut, not
adb reboot.
Full recipe: Auto-start on boot.
入门How do I schedule automatic power-on, power-off and a nightly reboot?
Use the power functions — the board’s RTC wakes it at the set time:
// every day: off at 23:00, on at 07:30, reboot at 04:00
ItempApiPub.setPowerOffTime(context, "23", "0", "0", true);
ItempApiPub.setPowerOnTime(context, "7", "30", "0", true);
ItempApiPub.setRebootTime(context, "4", "0", true);- The week argument is a single day, not a bitmask:
"0"every day,"1"Sunday …"7"Saturday. Call once per day for several days. - Cancel by calling again with
false. There is no getter for the current schedule — keep your own record. - Scheduled power-on needs standby power: cutting mains completely defeats it.
入门How do I control brightness, screen rotation and the backlight from my app?
setScreenBrightness(context, "0"–"255")—"0"is the dimmest level, not off.setScreenOrientation(context, "0" | "90" | "180" | "270")— set an absolute angle. (screenRotationsteps one position per call; do not mix the two.)setBacklightEnable(context, false)— blanks the panel while the board, network and schedules keep running. Useful for “screen off at night” without powering down.setHDMIoutEnable(context, true/false)— HDMI output on or off.
Reference: Display API.
进阶How do I read and drive GPIO pins from an Android app?
Read pins with the getters, which read the state directly:
String v = ItempApiPub.getGpio0(); // "0", "1" or "getGpio0 failed!"To set a level or direction, send the GPIO broadcast with a two-character code — first character = GPIO index, second = level ("01" = GPIO0 high, "20" = GPIO2 low):
Intent i = new Intent("android.intent.item.gpio.a0.set");
i.putExtra("value", "11");            // GPIO1 high
context.sendBroadcast(i);
Set a pin to input before reading it, and debounce in software (ignore changes within ~20 ms). The helper methods setGpioOut/setGpioInput address GPIO0. Pin locations and voltage: your board page. Reference: GPIO API.
进阶Which /dev/ttyS node is which serial connector?
It depends on the board — the board page lists the mapping. For example, on the KTM-S68:
| Connector | Device node |
|---|---|
| RS232-1 | /dev/ttyS0 |
| RS232-2 | /dev/ttyS6 |
| RS232-3 | /dev/ttyS9 |
| RS485 | UART0 |
If a board page does not list nodes yet, check on the device with ls /dev/ttyS* and a loopback test. Because the firmware is rooted, your app can open the ports without the permission changes generic boards need.
高级My RS485 / Modbus device does not answer or I lose bytes. What is wrong?
On our boards the RS485 direction is switched by the port hardware — do not toggle a GPIO for direction from your app; it is too slow and cuts off bytes.
| Symptom | Likely cause |
|---|---|
| No reply | Wrong node address or baud rate, or A/B swapped |
| Garbage bytes | Baud/parity mismatch or missing termination |
| Works intermittently | Termination wrong, or manual direction toggling |
| First byte lost | Direction turnaround timing |
Fit 120 Ω termination only at the two ends of the bus, and use a Modbus library rather than hand-built frames. Guide: RS485 and Modbus.
进阶How do I set a static IP or turn the device into a Wi-Fi hotspot?
ItempApiPub.setStaticIp(context, "192.168.1.50", "192.168.1.1",
        "255.255.255.0", "8.8.8.8", "8.8.4.4");
new ItempApiPub().startWifiAp(context, "SSID", "password", "192.168.43.1", false);- The static IP is applied asynchronously — an adb session over that interface will drop.
startWifiAp/stopWifiApare instance methods. The hotspot runs on 5 GHz; an invalid IP silently falls back to automatic.setNtpServer,setWolEnable(Wake-on-LAN) are also available.
Reference: Network API.
入门How do I use adb over the network?
Enable network debugging, then connect on port 5555:
ItempApiPub.setNetworkDebug(context, true);
// on your PC
adb connect <device-ip>:5555
Anyone on the same network can connect while it is on — enable it for provisioning or troubleshooting, then turn it off. Check the state with getNetworkDebugStatus. Reference: Debug API.
高级How do I lock a device down for unattended kiosk use?
Combine five layers:

- Install control:
intallBlock(context, packages, mode)with0disabled,1whitelist,2blacklist — note the method name is spelledintallBlock; match it exactly. setUsbStorageBlock(context, true)stops USB sticks.- Build a hidden exit before deploying — a locked device without one has to be reflashed.
Full checklist: Kiosk mode guide.
高级Can one board show different content on two or more screens?
Yes. Use Android’s Presentation API to put a different view on each display; our firmware handles the physical outputs. Independent displays per chip:
| SoC | Independent displays |
|---|---|
| RK3588 | up to 4 |
| RK3576 | up to 3 |
| RK3568 | up to 3 (2 simultaneous on most boards) |
| RK3566 | up to 2 |
The board’s connectors set the practical limit. MIPI panel timing is configured in firmware at the factory, so tell us your panels when ordering. Guide: Multi-display.
高级How do I run an AI model (e.g. YOLO) on the NPU?
Convert the model on a PC with RKNN-Toolkit2 (x86 Ubuntu 20.04+), then run it on the board with the RKNN runtime (librknnrt.so, C API) or RKNN-Toolkit-Lite2 (Python).
- Supported chips: RK3588, RK3576, RK3568, RK3566 — set
target_platformaccordingly. - Input formats: PyTorch, ONNX, TensorFlow, TFLite, Caffe, Darknet.
- INT8 quantization needs a representative calibration set — a poor one is the most common cause of bad accuracy on the board.
- The runtime version on the board must match the toolkit version.
Guide with examples: RKNN.
高级Can I run a small language model (LLM) locally on the device?
Yes, on RK3588 and RK3576 boards (KTM-S88CD, KTM-S76) with RKLLM. Models in the 1.5B–3B class run, for example Qwen2.5-1.5B-Instruct and DeepSeek-R1-Distill-Qwen-1.5B, quantized to w8a8 or w4a16 with RKLLM-Toolkit on a PC.
The NPU driver must be v0.9.6 or newer — the error “failed to open rknpu module” means it is missing or too old. Guide: RKLLM.
硬件选型
入门Which SoC should I choose for my project?
Start from what the device must do:

Each chip has a reference page listing the boards that use it: SoC reference. Not sure? Describe your project and we will recommend a board.
进阶How much NPU performance does each chip have?
| SoC | NPU | Boards |
|---|---|---|
| RK3588 | 6 TOPS | KTM-S88CD |
| RK3576 | 6 TOPS | KTM-S76 |
| RK3568 | about 1 TOPS | KTM-S68, S58, MS68 |
| RK3566 | about 0.8 TOPS | KTM-S68B, LT66, MS66 |
RK3399 and RK3288 have no NPU. Rule of thumb: 1 TOPS handles light detection or classification; 6 TOPS runs multiple models or a small LLM. Figures are from Rockchip’s published specifications.
进阶Should a new design use RK3399 / RK3288 or an RK35xx chip?
For a new design, choose an RK35xx chip (RK3588, RK3576, RK3568 or RK3566): newer Android (11–14 on our boards versus 8.1/7.1), an NPU on every model, and a longer road ahead. Keep RK3399/RK3288 boards for continuity of products that already ship on them — and ask us about the RK35xx equivalent when you plan the next revision.
进阶Will my LCD panel work with your board (LVDS, eDP, MIPI)?
Very likely, if the board has the matching interface — our boards offer LVDS, eDP and MIPI, and some V-by-One and HDMI. Every panel needs its own timing, voltage and backlight settings, which we set in the firmware.
Send us the panel’s datasheet (model, resolution, interface, timing) with your inquiry. For MIPI panels this is essential: the timing is configured in firmware at the factory.
入门What power supply does a board need?
Most boards take 12 V DC, 3 A through a barrel jack; the current actually drawn depends on the screen size and peripherals. Some smaller boards take 5–12 V, and several support PoE — check your board page.
An undersized supply is a common cause of random reboots and of flashing that drops mid-way. Size it for the panel plus peripherals, not for the board alone.
入门Can I buy just the mainboard without a display?
Yes. Every KTM mainboard is sold on its own, with the same firmware and system API as our finished displays — so you can prototype on a bare board and move to a complete device later without rewriting your app.
入门Where can I find a board’s pin table, serial map and dimensions?
On the board’s page in the public developer wiki — no account, no NDA. Each page lists the SoC, Android version, I/O, connector pinouts and size. Start at Boards, or enter your model on the support page.
入门How much RAM and storage do I need for a signage player?
As a rule of thumb: 2 GB RAM is enough for one app playing images and 1080p video; choose 4 GB for 4K video, web-based players or several apps. For storage, plan for your cached media plus room for updates — 16 GB or 32 GB eMMC covers most signage.
Options depend on the board (for example the KTM-S68 offers 2/4 GB RAM and 8/16/32 GB eMMC). Tell us your content and we will size it.
进阶Can the boards run in high or low temperatures (industrial use)?
Standard Rockchip parts are commercial-grade; industrial variants of some chips are rated for a wider range. The real limit is usually the whole device — enclosure, airflow, panel and power supply — rather than the chip alone.
Tell us the installation (indoor, shop window, outdoor; temperature range; enclosed or ventilated) and we will recommend the board, cooling and panel to match.
入门Do you also provide software to manage content on the screens?
Yes — our hardware runs LUMA AI Studio, the software platform of our family company, for content management and store applications. Because we also build the firmware, the hardware and the software are tested together. Your own app works as well: the system API is open to any app.
生产与 ODM
入门What can you customize for our product?
Every layer, because we build all of them:
- Firmware: system behaviour, kiosk lockdown, preinstalled apps, boot logo and animation, default settings, OTA delivery.
- Mainboard: I/O mix (RS232/RS485, GPIO, LAN, USB), display interface, size and connector placement.
- Display: panel, touch sensor and cover glass; open frame or finished unit, including stretched and special shapes.
- Enclosure and branding.
See Engineering, or start a project.
入门What is the minimum order quantity? Can we order samples first?
It depends on how much is customized: a standard board or display, modified firmware, or a fully custom device each have different minimums. Engineering samples are the normal first step of a custom project.
Share your expected quantity and timeline in Start a project, and we will reply with options for samples and production.
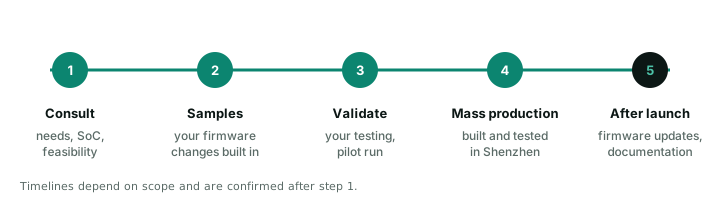
入门How long does a custom project take?
It depends on the scope. A firmware change on an existing board is much faster than a new mainboard or a fully custom display. We confirm the schedule after the first consultation, once requirements and the SoC are clear.
入门Which certifications do your devices have, and who pays for certifying a custom model?
Our quality management system is certified to ISO 9001:2015, and most of the products we sell carry CE (RED) and RoHS certificates from accredited test labs, plus FCC where they ship to the US. The full list, with certificate numbers, is on our company page.
Custom-developed models are certified as part of the project, and the certification cost is borne by the client. It can be included in the development fee, or you can have the device tested at a lab you choose — either way we supply the samples, documentation and test data. What a product needs depends on where it is sold or installed, so tell us your target markets at the start and we will confirm what applies and how certification fits the schedule.
进阶Who owns custom firmware and designs? Do you sign an NDA?
Ownership of project-specific firmware, designs and branding is defined in the project agreement, and we are happy to work under an NDA for confidential projects. Raise any requirements — source code escrow, signing keys, exclusivity — during the consultation so they are written into the agreement.
进阶How long will a model stay available? What happens at end of life?
Discontinued models stay listed on our site, marked as discontinued, so existing customers can still find documentation and support. For long-running projects, tell us your expected product lifetime: we plan supply and successor boards with you, and the system API stays the same across boards, which keeps migration to a newer board simple.
入门Why are there no prices on the website?
Most projects change something — panel size, I/O, firmware or enclosure — and each change affects the price. Request a quote on any product page (the model is filled in for you), or describe your project and we will reply with options and pricing.
高级Can you customize firmware for a board you did not make?
Talk to us. Our depth is on our own KTM boards, where we maintain the firmware end to end. For other hardware we assess feasibility case by case — it depends on the chip, the available board support package and who holds the signing keys.
支持与维护
入门Where do I find documentation and firmware for the model I have?
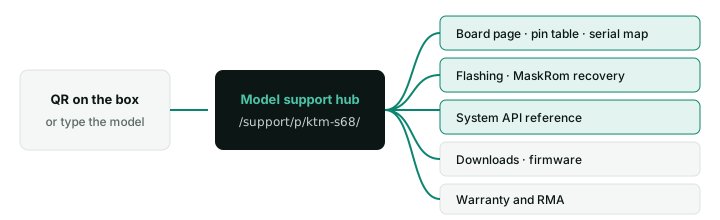
Enter the model printed on the label — or scan the QR code on the box — on the support page. The model hub links the board’s wiki page, flashing and recovery guides, the system API, downloads and warranty service.
入门Can I read the documentation before I buy?
Yes. The developer wiki is public, with no account and no NDA: board pin tables and serial maps, flashing and MaskRom recovery, the full system API and on-device AI guides. Engineers usually check it before choosing a board.
入门The board powers on but the screen stays black. Where do I start?
Attach a serial console first — the boot log tells you whether the board boots and the problem is the display, or whether it stops earlier.
- Boots fine (adb works) → check the panel cable, the panel’s power and backlight, and that the firmware is configured for your panel.
- Stops in the log → note the last lines and follow recovery if needed.
- No log at all → check the power supply and the serial wiring.
入门adb devices shows nothing. What should I check?
- Connect the USB OTG / device port — USB-A host ports do not carry adb.
- Use a data cable, not a charge-only one.
- Make sure USB debugging is on:
ItempApiPub.setUsbDebug(context, true), checked withgetUsbDebugStatus. - Accept the “Allow USB debugging” prompt on the screen if it appears.
- Alternatively use adb over the network.
进阶What logs should I send with a support request?
- The firmware version:
adb shell getprop ro.itemp.firmware.version. - The app log:
adb logcat -d > logcat.txtright after the problem. - For boot or crash problems: the serial console log from power-on.
- The model, serial number and what changed before it started.
autoLogCatch(context, true) records logs continuously for problems that are hard to reproduce — switch it off afterwards, it fills storage. Send everything through Contact an engineer.
入门How does the warranty and RMA process work?
- Check the basics: power, cables and a reflash — MaskRom recovery fixes most boot problems.
- Send model, serial number and symptoms through the engineer form, with a photo of the label if possible.
- Diagnosis: an engineer confirms whether it is a hardware fault and issues an RMA number.
- Repair or replace: ship the unit with the RMA number.
Start at Warranty & RMA. Warranty terms for your order are stated in your quotation.
高级How do we update firmware on devices already installed in the field?
Our firmware supports OTA updates, so you can ship signed firmware updates to deployed devices without visiting them; for small fleets on site, an SD card or USB flash also works. For custom firmware we prepare the update packages for your build. See OTA updates, or ask us to set up an update plan for your fleet.